Table of Contents
Having a mounted monitor can make your set-up – whether that be gaming set-up or office space – much more user-friendly.
However, the downside is that monitors have not historically been designed for the purposes of mounting.
Of course, you can buy mountable monitors nowadays, but not everyone can splash out on a brand new monitor if their current one is working just fine.
Typically, in order to be able to mount a screen, be that a TV or monitor, you need something on the screen called a VESA hole. 
In fact, you need a number of these. This is what the mounting kit gets connected to to support it on the wall.
VESA holes are decided by the Video Electronics Standards Agency. This is where the acronym comes from.
The VESA is a group of around 300 or so companies that unite to establish specific standards for the industry to keep people, namely consumers of their industry, safe.
VESA holes are determined based on what sort of mounting kit the screen needs in order to ensure it can be mounted safely.
Many older monitors and TVs do not have these VESA holes on the back. This can make mounting them a little bit more complicated. This may lead you to think that your old reliable monitor can never be mounted.
Likewise, even some newer monitors, such as those by Apple, are not known for their VESA compliance.
You may feel as though you are destined for a life of gaming, working, and watching without the luxury of a mounted screen. Think again.
Just because your monitor is without those necessary VESA holes, it does not mean you are destined to a mounted monitor-less life.
There are some methods you can use to get your monitor mounted. In this article, we will be exploring some of these methods, explaining how you can use them.
Methods of mounting a monitor without holes
The first step that needs to be taken before you mount any monitor to the wall is to check whether there are indeed VESA holes in the back of your monitor.
The reason we are specifying this is that some manufacturers do include holes, but do a good job of hiding them from plain sight.
Ensure you thoroughly check for VESA holes to establish whether it does indeed need an adapter or other device, or whether it can just be mounted using the methods we are going to give you.
Adapters direct from the monitors’ manufacturer
Some manufacturers, such as Apple, do not make the screens themselves VESA certified, meaning they cannot be mounted. However, they do sell compatible monitor mounting adapters that can make their devices safe for mounting.
These can be thought of as ‘aftermarket’ VESA mounts. This means that they are compliant with VESA standards but have to be bought separately.
Typically, these will come ready to attach to your monitor and give you instructions about how to mount it to your wall. You will most often find that these adapters come in the form of plates that can be attached to the back of your monitor.
This plate may have to be screwed into your monitor, depending on the type you purchase. Then, once the plate is installed, there will be attachments on there enabling you to fit it to a mounting kit for your wall or a stand if you wish.
You can even get free-standing mounts to attach your monitor to, allowing you to have an ergonomic setup without having to attach a mounting kit on your wall. This may work well if you are in a rented apartment or office.
Adapter clips
Another great way of mounting your monitor if it does not have VESA holes on the back is to get a clip mounting kit.

This method is much less invasive than the previous method as it does not involve screwing anything into the back of your monitor, which may put off some people.
These kits are readily available from online retailers, and the type you need will depend on the size of your monitor, but many of them are easily adaptable and can be suitable for various screen sizes.
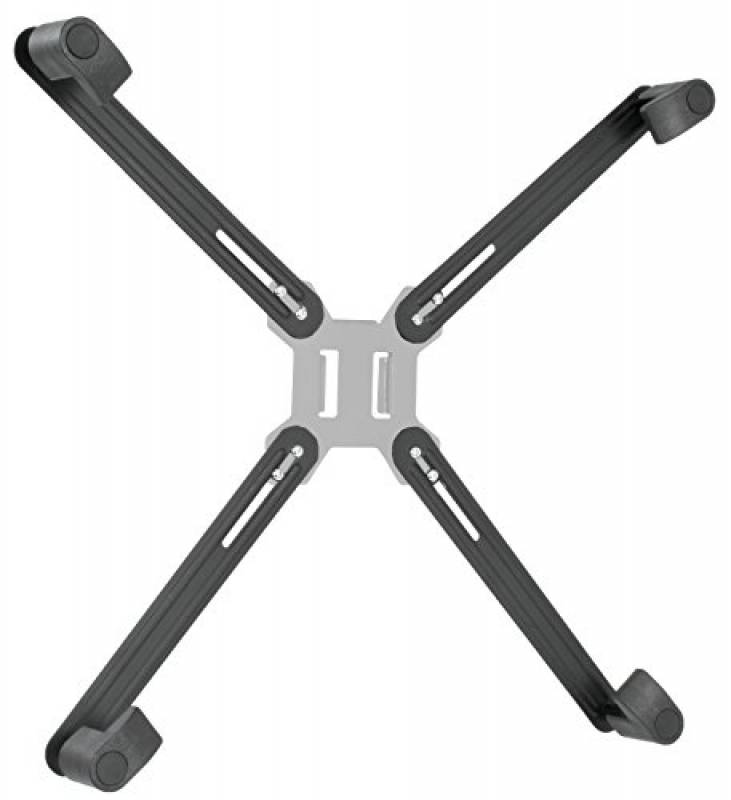
This sort of mounting kit tends to have four ‘arms’ that clip onto different areas of your monitor, spreading itself so that it holds the weight of your monitor equally.
You can then connect it to the wall using a mounting kit and bracket. There are also options to choose adapter clips that allow for adjustable movement.
The arms come over the edges of the monitor slightly so that you can see them a little around the edge of the screen. This may not be everyone’s preference, but all of the ones we have found are always subtle.
It is an excellent choice for someone wary of screwing things into their monitor. Because of their compatibility with most monitors, and their reasonable price, they are often a good choice for those wanting to gain a more ergonomic set-up on a budget.
Mounting a monitor with no holes – final verdict
As you can see, all is not lost if you own a monitor without holes. There are two main options to choose from. You can either purchase an adapter straight from the manufacturer.
This option works best for those people with newer monitors, such as those made by Apple, as they do not come with VESA holes already installed, but you can buy ‘aftermarket’ kits to ensure that you can mount it according to VESA compliance.
However, you may just have an older model, and the manufacturer may not stock adapter kits. In this case, you can purchase adapter clips online.
These tend to fit lots of different screen types and the size of your screen will determine what one you need to buy. They are relatively universal, so you will very likely find one to suit your particular monitor.
We hope that our article has allowed you to better understand how to mount a monitor without holes.


