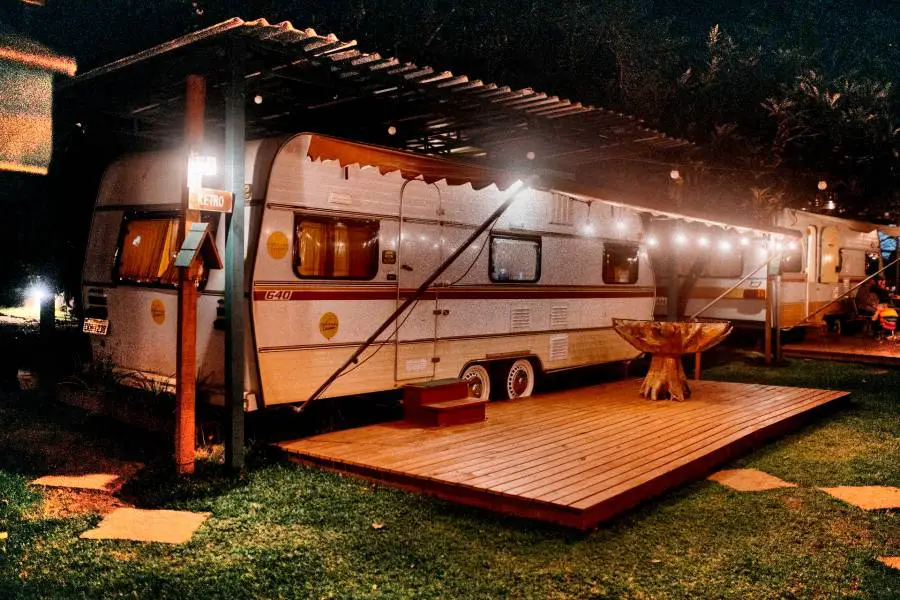
The travel trailer is a must-have for those that love exploring the world by road.
It gives you the convenience of traveling alone or with your family and also affords you the feel of the comfort of your home.
But, like every other vehicle, the travel trailer has its fair share of challenges, one of which is the roof.
The roof might need changing because it is bad or to make it more permanent.
But whatever the reasons are, this article will provide you with a complete guide on how you can build a roof over your travel trailer.
Types Of Travel Trailer Roof
When it comes to changing the travel trailer roof, the type of roofing material or sheet is essential.
Before making your choice, you should have all the information about the roofing material’s quality, durability, and costs.
Aluminum Roof
The aluminum roof is made from aluminum panels that are malleable, lightweight, and corrosion-resistant.
It is very durable and the best when it comes to weight because its strength-to-weight ratio is higher than other roofing metals.
Aluminum roofs boast easy maintenance, unique style coloration, and a long lifespan. Though it is a good roofing material, it is costly and prone to damage.
The cost of maintenance is higher when compared to other roofing materials.
Rubber Roof
The rubber roof is best suited for low-sloped and flat roofs. It is designed with water tight seal to prevent water from seeping into the travel trailer.
Other roof types rely on gravity to repel moisture, so they are built to form a steep slope to avoid moisture seepage.
The rubber roof has numerous benefits, like a long lifespan of up to 50 years, and is easy to clean and maintain.
Also, it is energy-saving, fast, and easy to install, and it improves curb appeal.
There are two types of rubber roofing, the ethylene propylene diene terpolymer (EPDM) and the Thermoplastic Polyolefin (TPO).
You might need the services of a technician to install this type of roof, and it has a high installation cost.
Vinyl Roof
The Vinyl roof significantly impacts the environment regarding smog and greenhouse gas emissions and reduces the urban heat island effect.
The vinyl roof is also called the Polyvinyl chloride (PVC) roof; it is regarded as a low slope, high-performing, single-ply roofing solution.
The PVC has a reflective ability that helps to keep the travel trailer cool in a hot climate. But, this type of roof is costly compared to other roofing materials.
Fiberglass Roof
The fiberglass roof is a roofing material made from glass fibers, hence fiberglass.
Fiberglass roof is solid and durable, and they can withstand stormy weather conditions and last for many years.
There are two types of fiberglass roofing materials in the market you have corrugated and sheets fiberglass.
The corrugated fiberglass roofing panel is the most popular because of its layered design. It is a very economical choice for roofing compared to other roofing materials.
Tools Needed For Building A Roof
There are some equipment and materials that are necessary to build a roof over your travel trailer, and they are listed:
4 X 4 pressure treated lumber posts
2 X 6 wooden beams
2 X 4 lumber for rafters
Plywood decking
Metal roofing materials (e.g., Aluminium)
Screws and power screwdriver for metal roofing
Nails
Hammer
Ladder
Cement
Post hole diggers
Tarpaper
Step By Step Guide To Build Roof Over Travel Trailer
The following are the easy step-by-step guides to building a roof over your travel trailer.
Place Pegs Around The Trailer
You have to measure the distance of the trailer to the pillar supporting the roof. After measuring as convenient to you, place four pegs each on both sides.
Also, measure out a square around the pegs for the concrete base.
Dig A Hole And Place The Pressure Treated Posts In It
Use the post-hole digger to create a spot from the marked square around the trailer. Then, place the 4 X 4 pressure-treated lumber posts into the hole.
Cement Around The Posts
After placing the posts into the hole, cement around it to keep it firm on the ground.
Cut And Nail The Beams To The Posts
Cut some 2 X 4 lumber to the beam’s proper size, attach them to the 4 X 4 pressure-treated lumber posts, and drill the nails to hold them firm.
Repeat this process to connect all the posts along the perimeter of the trailer using the beam.
Cut And Nail The Rafters To The Beam
Cut the 2 X 4 lumber to form a rafter, and nail the rafter to the beam across the trailer from one end to the other.
Cut And Nail Plywood To The Rafter
After nailing all the rafters, you can cut out plywood to size and nail them to the rafters.
Ensure that the plywood is correctly placed on the rafters before nailing it.
Apply Tarpaper
This step is for shingles roofing, but if you use metal roofing, ignore this step and move to step 9.
Apply the tarpaper to the plywood decking, and nail it down with roofing nails.
Nail Shingles To The Tarpaper Deck
If using shingles, nail them to the tarpaper deck and ensure that they are well fitted.
Screw The Metal Roofing To The Decking
With the help of a screw, attach the metal roofing (Aluminium) to the plywood decking.
Important/Safety Tips
The trusses at each end of the structure should be pre-built.
The trusses on the end of the structure should be nailed to the decking.
To enclose the roof, apply siding to match the trailer.
Give an extra 8-12 inches when measuring the rafter.
Wear slip-resistant shoes when installing a metal roof.
How To maintain Metal Roofing?
The maintenance tips are listed below:
Always Clean Debris From The Rooftop
Climb the roof using a ladder, and clean it using a 5% mix of sodium hydrochloride. Place the solution on the rooftop and flush it with a hose after 20 minutes.
Clean Snow And Ice From The Top Of The Roof
Removing snow or ice requires using a broom with a long handle or a roof rake. Use the broom or rake to sweep off the snow or ice.
Break Off Any Tree Branch That Is Overhanging Above The Roof
Overhanging branches over your roof is a source of more debris on the rooftop. Also, it can be a breeding ground for algae.
Check The Roof Regularly For Laks Or Scratches, And Fix It Immediately; If Any
Do a regular check-up for any leaks, so you can fix them immediately to prevent further damage.
Conclusion
Building a roof over your travel trailer can be less tedious when following the abovementioned guidelines.
But, while following the steps, ensure that you carry out safety measures to protect yourself from any harm.
Safety is always paramount, so stay safe as you build your new roof.