Table of Contents
Prepping means living without many of the modern conveniences we have today. One of the most prominent conveniences is electricity.
One of the best things about learning ways to get things done without electricity is that you will save money on your electric bill. Every dollar you save on your monthly utility bill can contribute to paying off debt or buying more supplies for your emergency storage.
Food preservation is a big deal in the prepping world. It is no secret that after SHTF, you will need to grow food. You will also need to preserve it to last through the off-season when you can’t grow a bountiful garden.
Without freezing the food, you are left with one option – drying your food.
That big dehydrator in the kitchen will not do much good without electricity. The sun will be your new dehydrator. A solar dehydrator processes the food with the help of solar energy to make it long-lasting and for future purposes.
Although it’s extensively used in camping and hiking, you can also use it in survival when there is no option. The bright sun rays can enhance the performance of the solar dehydrator beyond electricity and gas.
Its compact size and quick build make it an excellent alternative to our traditional dehydrator.
Building a solar dehydrator with your electric tools will save you a lot of hassle in an SHTF situation. Plus, you can start using your dehydrator and learning the ins and outs of drying food with the sun.
And, you will save electricity while preserving food for your survival pantry.
Why have Dehydrating Food?
- Consume fresh fruits and vegetables along with storing them in a solar dehydrator when available in surplus.
- Produce healthy snacks from fresh produce.
- Make fruit and vegetable leather that are tasty treats made from dried food.
- Save money by storing food for future purposes without buying it every season.
Building a Solar Dehydrator
Supplies Needed
- 2 6-foot 2x4s. You could also use an old pallet as long as the wood is sound
- Screws/nails
- Window screening material
- Old glass window – look at second-hand stores, junk yards, or Craig’s List
- Hinges
- Plastic sheeting or corrugated plastic sheets
- 2 6-foot 1x2s
- Start with a small dehydrator at first. You can choose to have legs on the dehydrator or set it on a makeshift base. Legs prevent you from bending over or kneeling on the ground.
- Use 2x4s to create a square. The size is up to you, but a starter would be 3 foot by 3 foot square. Meaning you will only need to purchase 2 6-foot 2x4s. *If you are using an old window, your frame will need to be built to match the size of the window frame.
- Use nails or drill screws into the ends to form your square.
- Stretch a piece of the window screening material on the underside of your dehydrator. Secure it with nails or screws. A staple gun would also suffice.
- For your top or lid, you have several options.
Option A: Use 1×2 pieces of wood to create the same size square of your frame
For this, we will use the 3×3 frame.
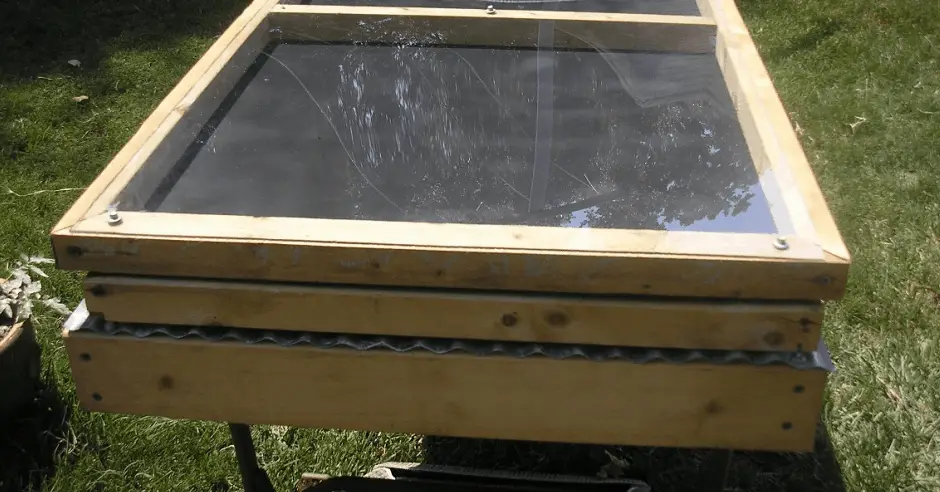
Place the square on top of the mainframe and attach hinges to the back side. The top frame will open upwards. Stretch plastic above the top frame and secure with a staple gun.
You will need to replace the plastic each season.
Option B: Make the same frame as above with 1x2s or cut wood from a pallet to make the top frame
Attach a plastic polycarbonate sheet over the top of the frame. You can find these sheets at any home improvement store.
They are available in different sizes. However, you may need to cut the plastic to fit your frame. Attach the hinges to the back side to open the frame upwards.
Option C: Use an old window in a wood frame
Attach the hinges to the back/top of the window so that when put on top of the bottom frame, the window opens upwards. Glass is an excellent material as a dehydrator.
These are the basics of your solar dehydrator. If you want to attach legs, it is a simple process. Use 4x4s cut to the desired height and attach it to the bottom.
Again, look for old pallets to save money. The wood may not be pretty, still has a lot of life. If you want it to look pretty, add a fresh coat of stain.
Putting the dehydrator box on a couple of bricks will work as well. You don’t want it to sit directly on the ground as it will block the airflow you need.
To use your solar dehydrator, place the frame in full sun. Shade should not cover the dehydrator. Place your sliced food on the screen and close the lid. The airflow from under the box will allow the food to dry evenly while the sun’s rays heat the box from above.
If your dehydrator isn’t getting hot enough, you can put a sheet of plastic or thin plywood on the underside. The plastic will trap the heat inside the box as soon as it enters it.
Hence, you can dry your food even if the weather is unfavorable. However, you will need to prop the top lid open by about half an inch to allow airflow.
A sealed plastic box would hold in the condensation from your drying food and impede the drying process.
How does Solar Dehydrator Work?
Firstly, the food is chopped or sliced and put on the trays or cheesecloth layers. Then it’s placed inside the dehydrator.
Then, depending on the size of your solar dehydrator, the food is ready within two days. There is no restriction to the use of solar dehydration in any weather as long as sunlight is available.
Some Tips for Your Solar Dehydrator
- Ventilation of the solar dehydrator should be clear for a good amount of air circulation around the food.
- Prevent and fill any opening that might allow pests to infest the food.
- Parts should be easy to remove for easy cleaning and be able to assemble again.
- The material of the solar dehydrator should not react with the food. Choose carefully.
- It should have a shield of cover to prevent its contact with rain or rough weather.
You can build this box for under $20, and if you use recycled materials or scrap wood. Build several if you have a large, prolific garden. The idea is to build now with electric tools and a store to buy the materials.


