Table of Contents
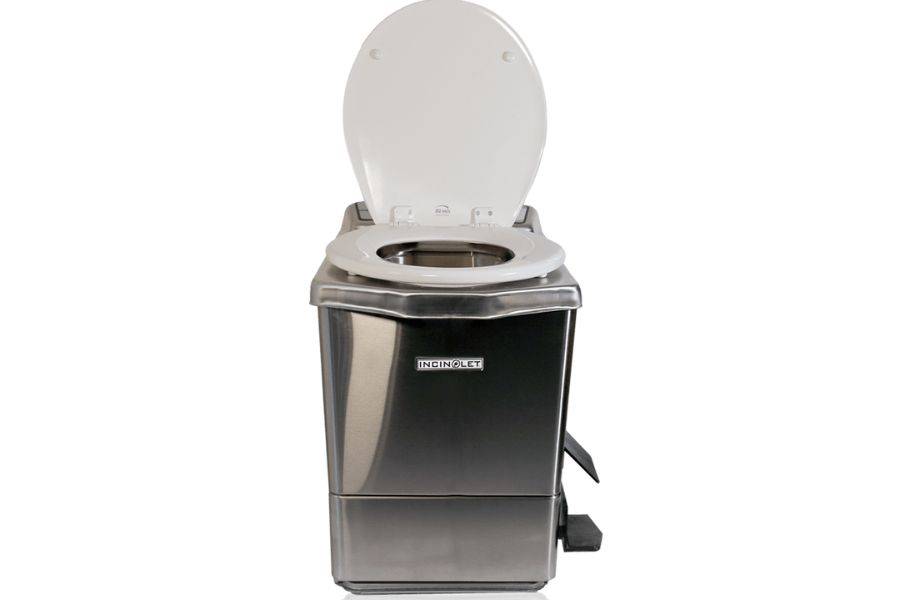
In the quest for sustainable living and self-sufficiency, especially in off-grid locations, the incinerator toilet represents a significant advancement in eco-friendly waste management.

Unlike traditional systems that require water and intricate plumbing, incinerator toilets employ high-temperature combustion to convert human waste into sterile ash.
This guide is designed to walk you through the process of building your own DIY incinerator toilet, focusing on the use of metal and masonry for durability and effectiveness.
Foundations of Incinerator Toilets
Principles of Operation
Incinerator toilets operate on a simple but effective principle: using heat to incinerate waste.
These devices can reach temperatures high enough to reduce solid waste to a small volume of ash, essentially sterilizing it in the process.
The beauty of this system lies not only in its simplicity but also in its adaptability to either electric heating elements or wood as a heat source.
This flexibility makes it an ideal solution for a variety of settings, from remote cabins to eco-conscious households seeking to minimize their water usage and sewage output.
Environmental Impact
The ecological footprint of incinerator toilets is remarkably low. By eliminating the need for water in the waste disposal process, they conserve precious resources and reduce the burden on sewage treatment facilities.
Furthermore, the ash produced is minimal and can often be used as compost, closing the loop in a sustainable cycle of waste management.
However, it’s essential to consider the energy used to power the incineration process, emphasizing the importance of energy-efficient designs.
Designing Your Incinerator Toilet
Choosing Materials
The choice of materials is critical in building a durable and efficient incinerator toilet.
Metal components are necessary for areas exposed to high heat, such as the incineration chamber, due to their ability to withstand temperatures without degrading.
Masonry, on the other hand, offers excellent insulation properties and durability for the structure’s exterior.
Selecting high-quality, heat-resistant materials ensures the longevity and safety of your DIY project.
Layout and Dimensions
A compact, ergonomic design is vital for a user-friendly incinerator toilet.
The layout should accommodate easy access for waste insertion and ash removal while ensuring that the heat source and ventilation system operate efficiently.
Calculating the dimensions requires a balance between space-saving considerations and the need for a functional incineration chamber size.
Allow ample room for insulation and air circulation to optimize performance.
Constructing the Incineration Chamber
Constructing the incineration chamber is the most critical aspect of building a DIY incinerator toilet. This section forms the core where waste is incinerated, transforming it into ash.
The process involves several detailed steps requiring precision and attention to safety.
The following guidelines are based on principles outlined in various sources, including the EPA’s insights into incineration processes and practical guidance from resources like “The Incinerator Guidebook” and instructive platforms such as Instructables.
Step 1: Planning and Design
Before any physical work begins, spend time designing the chamber. Consider the size based on expected usage, ensuring it’s large enough to handle waste but not so large as to be inefficient.
Draft detailed blueprints that include dimensions, ventilation system placement, heat source integration, and access points for waste insertion and ash removal.
Step 2: Material Selection

Choose materials capable of withstanding high temperatures without degrading. For the inner lining of the chamber, firebricks are ideal due to their thermal resistance and durability.
The exterior can be constructed from regular bricks or cinder blocks. For the metal components, stainless steel is recommended for its heat tolerance and resistance to corrosion.
Step 3: Building the Foundation
Create a stable and level foundation for the incineration chamber. Lay a concrete slab that extends beyond the chamber’s footprint on all sides.
This ensures stability and provides a non-flammable surface around the chamber.
Step 4: Constructing the Walls
Start building the walls using firebricks for the inner layer. Secure them together with a high-temperature mortar.
It’s essential to leave an opening for waste insertion at the top and an ash removal port at the bottom.
Construct the outer walls with your chosen materials, maintaining a gap between them and the firebrick layer for insulation purposes.
Step 5: Installing the Heat Source
For electrically powered incinerators, install the heating elements at this stage, ensuring they’re positioned to provide uniform heat distribution within the chamber.
If using a wood-burning system, construct a grate or support for the wood, ensuring adequate air flow for combustion. Install temperature sensors to monitor the chamber’s heat levels.
Step 6: Adding Insulation
Fill the gap between the inner firebrick layer and the outer wall with insulating materials, such as ceramic fiber blankets or vermiculite.
This layer keeps the heat focused inside the chamber and protects the outer structure from excessive temperatures.
Step 7: Ventilation System
The ventilation system plays a crucial role in removing smoke and odors from the incineration process. Efficient design directs exhaust gases outside, maintaining indoor air quality.
Incorporate a chimney or exhaust pipe that extends above the roofline for optimal smoke dispersal, and consider wind direction in its placement to avoid smoke re-entering the dwelling.
Use heat-resistant materials for the ventilation system to withstand the high temperatures of the exhaust gases. Metal piping is a suitable choice, providing durability and resistance to corrosion.
The installation should ensure a tight seal at all connections to prevent leaks, with support to secure the piping against environmental factors.

Step 8: Finishing Touches
Install the door or hatch for waste insertion, making sure it seals tightly to prevent heat loss and smoke escape.
Attach the ash removal port door at the bottom, ensuring easy access for cleaning while maintaining a tight seal during incineration.
Step 9: Testing
Before using the incinerator toilet, conduct a test burn without waste to verify the effectiveness of the ventilation and heat systems.
Monitor the temperature and make any necessary adjustments to ensure efficient operation.
Step 10: Safety Measures
Install safety features, including thermal insulation around the exterior, a secure door latch to prevent accidental opening during operation, and clear instructional labels for safe use.
Through meticulous planning, careful selection of materials, and precise construction, you can build an effective and durable incineration chamber for your DIY incinerator toilet.
Following these steps will ensure that your system operates efficiently, safely transforming waste into ash and contributing to sustainable waste management practices.
Enhancements and Modifications
Modifications to improve efficiency may include upgrading to a more energy-efficient heating element or enhancing the insulation to better retain heat.
Experimenting with different materials or configurations can yield significant improvements in energy use and operational efficiency.
Adding custom features like a comfortable seat, aesthetic enhancements, or user-friendly controls can make your DIY incinerator toilet not only functional but also a pleasant addition to your home.
Tailoring the design to fit your specific needs and preferences adds value and satisfaction to the project.
Conclusion
Building a DIY incinerator toilet is a viable project for those interested in sustainable waste management solutions.
By following this guide, you’ll be equipped with the knowledge and steps necessary to construct an eco-friendly, efficient, and safe incinerator toilet.
This system not only contributes to environmental conservation but also offers a practical solution for areas lacking conventional plumbing infrastructure.
With careful planning, quality materials, and regular maintenance, your DIY incinerator toilet will serve you well for years to come.


![DIY Snow Shovel [Step-By-Step Guide] DIY Snow Shovel [Step-By-Step Guide]](https://homesteadandprepper.com/wp-content/uploads/2022/07/Making-homemade-snow-shovel-150x150.jpg)


